Showing posts with label OpenGL ES. Show all posts

Saturday, October 19, 2013

Building mobile game engine with Android NDK: 4 - timing service


all parts:
1 - installing the tools and running samples
2 - calling C++ library from Java
3 - abstracting types and logging
4 - timing service

 today we will create first from the set of services. It will be timing service. Service is here some class or set of classes that enclose some functionality and is fully reusable in future projects.

 Until now our engine run as fast as possible calling engine_tick method. In this method we set background color but so far we do not know how much time elapsed form previous call. So we have no information that would be handy in whatever you can imagine - timing animation, showing the player time spent in level, timing bombs explosion, etc.

Project structure

 On the image bellow you can see project structure. New files we are going to create today are highlighted with green. Beside this we will make changes into Main.cpp. As the timing service is the first one from set off services we will create in future we are also going to create Context class. This class works as a bag full of services which is easy to reference and handle inside game.


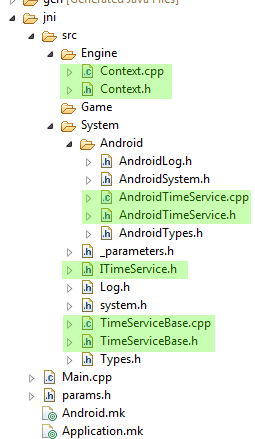
 As with the logging class we are preparing ourselves for future when we want to go cross-platform. ITimeService.h is abstract interface class that defines interface that will be common for all supported systems -  only Android now. TimeServiceBase is class that implements those parts of the ITimeService, that are the same for all systems. Finally, AndroidTimeService implements rest of the methods.

Implementation

 Listing for ITimeService.h is simple:
#ifndef ITIMESERVICE_H_
#define ITIMESERVICE_H_

#include "Types.h"
#include "Log.h"

namespace SBC
{
namespace System
{

class ITimeService
{
public:
 virtual ~ITimeService() {};

 virtual void reset() = 0;
 virtual void update() = 0;

 virtual f64 now() = 0;
 virtual f32 elapsed() = 0;
};

} /* namespace System */
} /* namespace SBC */
#endif /* ITIMESERVICE_H_ */

 The common base for all systems looks like this:
#ifndef TIMESERVICEBASE_H_
#define TIMESERVICEBASE_H_

#include "ITimeService.h"

namespace SBC
{
namespace System
{

class TimeServiceBase : public ITimeService
{
public:
 TimeServiceBase();
 virtual ~TimeServiceBase();
 void construct();

 void reset();
 void update();

 f64 now();
 f32 elapsed();

 static unsigned long getTickCount();

private:
 f32 mElapsed;
 f64 mLastTime;
};

} // namespace System
} // namespace SBC

#endif // TIMESERVICEBASE_H_

 We added some member variables to store elapsed time from last update of timer and also previous time. This base class also has construct method. This method is part of construction of the object. First the constructor is called and then construct method is called. It is called two-phase construction. Imagine that you are creating new object that needs to create several other objects on the heap. Next imagine that first of these objects is successfully created but you get out of memory error when constructing the second one. In such a case the original object is not constructed and thus its destructor is not called. But you already successfully created on of its child objects in constructor. Who will destruct it? Answer is no one - you will get memory leak.
 Opposite to this you can do two phase construction. First allocate the object and just initialize its member variables that do not need additional memory allocations or do thing that can not fail. Then call construct method that will do the rest. Good explanation and example of this can be found here.
 We are not allocating any memory for time service now. But what if there was system that would need it in future...

 Implementation of TimeServiceBase is here:
#include "TimeServiceBase.h"

#undef LOG_TAG
#define LOG_TAG "TimeServiceBase"

namespace SBC
{
namespace System
{

//------------------------------------------------------------------------
TimeServiceBase::TimeServiceBase() :
  mElapsed(0.0f), mLastTime(0.0f)
{
}

//------------------------------------------------------------------------
TimeServiceBase::~TimeServiceBase()
{
}

//------------------------------------------------------------------------
void TimeServiceBase::construct()
{
 LOGI("TimeService constructed");
}

//------------------------------------------------------------------------
void TimeServiceBase::reset()
{
 LOGI("TimeService reseted");
 mElapsed = 0.0f;
 mLastTime = now();
}

//------------------------------------------------------------------------
void TimeServiceBase::update()
{
 // Checks elapsed time since last frame. It is important to
 // work on double with current time to avoid losing accuracy
 // Then we can go back to float for elapsed time.
 double lCurrentTime = now();
 mElapsed = (f32)(lCurrentTime - mLastTime);
 mLastTime = lCurrentTime;
}

//------------------------------------------------------------------------
f64 TimeServiceBase::now()
{
 LOGE("Feature not implemented for current system");
 return 0;
}

//------------------------------------------------------------------------
f32 TimeServiceBase::elapsed()
{
 return mElapsed;
}

//------------------------------------------------------------------------
unsigned long TimeServiceBase::getTickCount()
{
 LOGE("Feature not implemented for current system");
 return 0;
}

} // namespace System
} // namespace SBC

 As you can see some methods just say "Feature not implemented for current system". I found this very useful when I was adding new Tizen system into my cross platform engine. As I was writing Tizen implementation of the all the services one by one I was able to run it and when I came across some that was not implemented yet I got log message about it but there was minimum of crashes. Also when see this you know there is needed some system specific implementation.

Android implementation

 Now we can implement Android specific parts. AndroidTimeService.h has this listing:
#ifndef TIMESERVICE_H_
#define TIMESERVICE_H_

#include "../TimeServiceBase.h"
#if (PLATFORM_ID == PLATFORM_ANDROID)

namespace SBC
{
namespace System
{

class TimeService: public TimeServiceBase
{
public:
 TimeService();
 virtual ~TimeService();

 f64 now();

 static unsigned long getTickCount();
};

} /* namespace System */
} /* namespace SBC */
#endif // PLATFORM_ANDROID

#endif /* TIMESERVICE_H_ */

and implementation is like this:
#include "AndroidTimeService.h"
#if (PLATFORM_ID == PLATFORM_ANDROID)

#undef LOG_TAG
#define LOG_TAG "TimeService"

#include <time.h>

namespace SBC
{
namespace System
{

//------------------------------------------------------------------------
TimeService::TimeService()
{
}

//------------------------------------------------------------------------
TimeService::~TimeService()
{
}

//------------------------------------------------------------------------
f64 TimeService::now()
{
 timespec lTimeVal;
 clock_gettime(CLOCK_MONOTONIC, &lTimeVal);
 return lTimeVal.tv_sec + (lTimeVal.tv_nsec * 1.0e-9);
}

//------------------------------------------------------------------------
unsigned long TimeService::getTickCount()
{
 timespec lTimeVal;
 clock_gettime(CLOCK_MONOTONIC, &lTimeVal);
 return lTimeVal.tv_sec * 1000 + (lTimeVal.tv_nsec * 1.0e-6);
}

} /* namespace System */
} /* namespace SBC */

#endif // PLATFORM_ANDROID

 In now method we are reading current time for monotonic clock. But, what is current time? According for example to this documentation you can read that it is "Clock that cannot be set and represents monotonic time since some unspecified starting point.". The starting point is often system boot. Fortunately it is not interested for us. We need it just to measure time leaps from one call to another and to calculate the elapsed time. Last time as well as elapsed time are in seconds.

Creating context class

 Our first service is created so let's put it into bag for services - into the context. But first we have to create this bag. This is the header for Context class. It is first class that is created in Engine directory of our engine structure:
#ifndef CONTEXT_H_
#define CONTEXT_H_

#include "../System/system.h"

namespace SBC
{
namespace Engine
{

class Context
{
public:
 Context();
 ~Context();

public:
 // application
 void setApplication(SBC::System::Application* aApplication);
 SBC::System::Application* getApplication();

 //time service
 void setTimeService(SBC::System::TimeService* aTimeService);
 SBC::System::TimeService* getTimeService();

private:
 SBC::System::Application* mApplication;
 SBC::System::TimeService* mTimeService;
};

} // namespace Context
} // namespace SBC

#endif // CONTEXT_H_

 As can be seen it is just set of getters and setters. Only interesting is destructor because ownership of all created services is handeled to context and it is then responsible for destructing them (except for application). In implementation you can see it:
#include "Context.h"

#undef LOG_TAG
#define LOG_TAG  "Context"

namespace SBC
{
namespace Engine
{

//------------------------------------------------------------------------
Context::Context()
{
 mApplication = NULL;
 mTimeService = NULL;
}

//------------------------------------------------------------------------
Context::~Context()
{
 LOGI("Deleting TimeService");
 if (mTimeService != NULL)
 {
  delete mTimeService;
  mTimeService = NULL;
 }
}

//------------------------------------------------------------------------
void Context::setApplication(SBC::System::Application* aApplication)
{
 mApplication = aApplication;
}

//------------------------------------------------------------------------
SBC::System::Application* Context::getApplication()
{
 return mApplication;
}

//------------------------------------------------------------------------
void Context::setTimeService(SBC::System::TimeService* aTimeService)
{
 mTimeService = aTimeService;
}

//------------------------------------------------------------------------
SBC::System::TimeService* Context::getTimeService()
{
 return mTimeService;
}

} // namespace Context
} // namespace SBC

 Maybe you noticed that in all .cpp files, there is defined LOG_TAG in the very top. This tag helps in debugging as all log messages from the same .cpp file are tagged with it.

 As a last step change system.h file - add TimeService to it:
// Android platform
#if (PLATFORM_ID == PLATFORM_ANDROID)
 // system
 #include "Android/AndroidSystem.h"
 // time service
 #include "Android/AndroidTimeService.h"

 As we have now also the context we can wire it into Main.cpp. We will initialize the services when the engine starts and destroy the context (and all services in it) when the engine is to be destroyed.

Wiring context

 Change top of the Main.cpp to this:
//BEGIN_INCLUDE(all)
#include "src/System/system.h"
#include "src/Engine/Context.h"

#undef LOG_TAG
#define LOG_TAG "Main"

using namespace SBC::System;
using namespace SBC::Engine;

Context* gContext = NULL;

 Adjust engine_start and engine_stop methods:
//------------------------------------------------------------------------
static void engine_start(JNIEnv* aEnv, jobject aObj, jobject aAssetManager)
{
 LOGD("Starting engine ...");

 AAssetManager* assetManager = AAssetManager_fromJava(aEnv, aAssetManager);
 
 // create context that holds particular system services
 LOGI("Creating game context");
 gContext = new Context();
 
 // SERVICES
 // time service
 LOGI("Creating and initializing TimeService");
 TimeService* tm = new TimeService();
 tm->construct();
 gContext->setTimeService(tm);

}

//------------------------------------------------------------------------
static void engine_stop(JNIEnv* aEnv, jobject aObj, jboolean aTerminating)
{
 LOGD("Stopping engine ...");
 
 LOGI ("Deleting game Context");
 if (gContext != NULL)
 {
  delete gContext;
  gContext = NULL;
 }
}

and also adjust resume_engine method. We will reset the time service in it:
//------------------------------------------------------------------------
static void engine_resume(JNIEnv* aEnv, jobject aObj)
{
 LOGI("Resuming engine - resetting time");
 gContext->getTimeService()->reset();
}

 Finally, to see some effect change engine_tick method to this:
//------------------------------------------------------------------------
static void engine_tick(JNIEnv* aEnv, jobject aObj)
{
 TimeService* time = gContext->getTimeService();
 time->update();


 // do something
 static f32 counter = 0.0f;
 f32 elapsedTime = time->elapsed();
 counter += elapsedTime;
 if (counter > 1.0f)
  counter = 0.0f;

 // Just fill the screen with a color.
 glClearColor(1.0f - counter, 1.0f, counter, 0.0f);
 glClear(GL_COLOR_BUFFER_BIT);
}

 the counter variable is based on value of counter and the screen is blinking from yellow to light blue. The complete change of color takes 1 second.

Conclusion

 Today we created first of engine services - the TimeService. It tells us how much time elapsed from last tick and we can use this information to adjust whatever is based on real time in the game. Thanks to this we can base for example our animations on real time and not on frame rate which may differ from device to device.

 Download TutGame-04.zip


Tuesday, September 10, 2013

Building mobile game engine with Android NDK: 3 - abstracting types and logging


all parts:
1 - installing the tools and running samples
2 - calling C++ library from Java
3 - abstracting types and logging
4 - timing service


 Last time we ended with displaying green screen. We set all the needed things on java side and we created Main.cpp on C++ side. Today we will do things that will prepare our engine for going multiplatform. So, there will not be to much fun but it will pay soon in next parts of this series.


Project structure

 After the last article we ended with jni folder in our project with structure like this:


 When we finish today the structure will look like this:


 So, first go into jni folder and create all new subfolders: src, Engine, Game, System and under System also the Android folder. In future there will be some common system files in System folder. Usually some abstraction of some feature like touch input and in folder with concrete system name there will be implementation of this feature.


Adjusting Main.cpp

 Go to Main.cpp and in the top remove these lines:

#include <jni.h>
#include <errno.h>
#include <stdio.h>
#include <android/sensor.h>
#include <android/asset_manager.h>
#include <android/asset_manager_jni.h>

#include <GLES2/gl2.h>
#include <GLES2/gl2ext.h>

 and replace it with these lines:

//BEGIN_INCLUDE(all)
#include "src/System/system.h"

#undef LOG_TAG
#define LOG_TAG "Main"

using namespace SBC::System;

 The purpose of the LOG_TAG will be clear soon. You can also see that we will structure our engine with namespaces to keep it clean.


Parameters

  As the engine will grow and support more platforms and features, we will need some way how to parametrize it. So in the same folder as Main.cpp resides, create file params.h with the following content:

#ifndef PARAMS_H
#define PARAMS_H

//---------------- TARGET -----------------------------
// define target platforms
#define PLATFORM_ANDROID 1
#define PLATFORM_BADA  2
#define PLATFORM_WIN  3
#define PLATFORM_TIZEN  4
// choose target platform
#define PLATFORM_ID   PLATFORM_ANDROID

//---------------- OPEN GL ----------------------------
// define parameters for other sources
#define SBC_USE_OPENGL
// use values 1 or 2
#define SBC_USE_OPENGL_VERSION 2

//---------------- RESOLUTION -------------------------
// resolution
#define FRAMEBUFFER_WIDTH 1280
#define FRAMEBUFFER_HEIGHT 800

#endif /* PARAMS_H */

 In this file additional parameters will be added in future. From here I am switching various debugging features on and off.
 What we set now is that we say we are using Android (PLATFORM_ID = PLATFORM_ANDROID). We plan to use OpenGL in its version 2.0 and the target resolution for our game is 1280 x 800. The target resolution is not size of your device screen but buffer the OpenGL draws in. It is than scaled to your device screen.

 Now go to System folder and create file _parameters.h in it. The only purpose is to suck content of params.h into engine. As the params.h can be different for different platforms and we do not want to change or set up anything in System folder in future we are doing it in this way. The file looks like this:

#ifndef PARAMETERS_H_
#define PARAMETERS_H_

#include "params.h"

#endif /* PARAMETERS_H_ */


Abstract system

 In System folder create file system.h. If you later in your engine or game will need some system features like logging you will call it every time in the same way regardless of the actual system. Put these lines into the file:

#ifndef SYSTEM_H_
#define SYSTEM_H_

#include "_parameters.h"

/*
 *  define some common constants, typedefs, etc.
 */

#include "Types.h"
#include "Log.h"

// Android platform
#if (PLATFORM_ID == PLATFORM_ANDROID)
 // system
 #include "Android/AndroidSystem.h"

// Bada platform
#elif (PLATFORM_ID == PLATFORM_BADA)
 // system
 #include "bada/badaSystem.h"

// Win platform
#elif (PLATFORM_ID == PLATFORM_WIN)
 // system
 #include "Win/WinSystem.h"

// Tizen platform
#elif (PLATFORM_ID == PLATFORM_TIZEN)
 // system
 #include "Tizen/TizenSystem.h"
#endif

#endif /* SYSTEM_H_ */

 As you can see, while we are working with Android today I left also other systems there. In Eclipse it will be grayed out to mark that preprocessor is skipping it.

 Next create Log.h and Types.h that have similar structure.

 Log.h:
#ifndef LOG_H_
#define LOG_H_

#include "_parameters.h"

/*
 * define platform specific things
 */

// Android platform
#if (PLATFORM_ID == PLATFORM_ANDROID)
 // basic system
 #include "Android/AndroidLog.h"

// Bada platform
#elif (PLATFORM_ID == PLATFORM_BADA)
 #include "bada/badaLog.h"

#elif (PLATFORM_ID == PLATFORM_WIN)
 // basic system
 #include "Win/WinLog.h"

#elif (PLATFORM_ID == PLATFORM_TIZEN)
 // basic system
 #include "Tizen/TizenLog.h"

#endif

#endif /* LOG_H_ */

Types.h:
#ifndef TYPES_H_
#define TYPES_H_

#include "_parameters.h"

// Android platform
#if (PLATFORM_ID == PLATFORM_ANDROID)
 // types
 #include "Android/AndroidTypes.h"

// Bada platform
#elif (PLATFORM_ID == PLATFORM_BADA)
 // types
 #include "bada/badaTypes.h"

// Win platform
#elif (PLATFORM_ID == PLATFORM_WIN)
 // types
 #include "Win/WinTypes.h"

// Tizen platform
#elif (PLATFORM_ID == PLATFORM_TIZEN)
 // types
 #include "Tizen/TizenTypes.h"

#endif

#endif /* TYPES_H_ */

 You see that its purpose is again just to load concrete implementation from selected system folder. Now we can go into Android folder and implement it.


Android implementation

 We have selected Android in parameters and our engine now awaits concrete implementation for system, logging and types. Let's make it happy.

 First create file AndroidTypes.h in Android folder and fill it like this:

#ifndef ANDROIDTYPES_H_
#define ANDROIDTYPES_H_

#include "../_parameters.h"

#if (PLATFORM_ID == PLATFORM_ANDROID)

// typedefs for safe datatypes
typedef unsigned char   u8;
typedef signed char   s8;
typedef char     c8;
typedef unsigned short  u16;
typedef signed short  s16;
typedef unsigned int  u32;
typedef signed int  s32;
typedef float   f32;
typedef double   f64;

#endif // PLATFORM_ANDROID

#endif /* ANDROIDTYPES_H_ */

 You see that we abstracted C++ types with our own. In the rest of the engine we will use s32 instead of int or u16 instead of unsigned short. In this way we can construct 32 signed integer needed by engine from int on most of today platforms but in case int was only 16bits on some platform we can construct it from long which will probably be 32bit. But our engine will use s32 and will not be interested what is behind.

 Now to logging. It is nice that Android has __android_log_print function in log.h file. But again it is not general enough for multiplatform engine. So, we will abstract it in file AndroidLog.h like this:

#ifndef ANDROIDLOG_H_
#define ANDROIDLOG_H_

#include "../_parameters.h"

#if (PLATFORM_ID == PLATFORM_ANDROID)
#include <android/log.h>

// logging functions with fixed tag
#define  LOGD(...)  __android_log_print(ANDROID_LOG_DEBUG, LOG_TAG, __VA_ARGS__)
#define  LOGI(...)  __android_log_print(ANDROID_LOG_INFO, LOG_TAG, __VA_ARGS__)
#define  LOGW(...)  __android_log_print(ANDROID_LOG_WARN, LOG_TAG, __VA_ARGS__)
#define  LOGE(...)  __android_log_print(ANDROID_LOG_ERROR, LOG_TAG, __VA_ARGS__)

#endif

#endif /* ANDROIDLOG_H_ */

 We defined four macros and in the rest of the engine we will use it just like: LOGD("Hello");
 Here comes into play the LOG_TAG we defined in the top of the Main.cpp. We will define it in every source file so logging will always say us where we used it.

 Finally create file AndroidSystem.h with this content:

#ifndef ANDROIDSYSTEM_H_
#define ANDROIDSYSTEM_H_

#include "../_parameters.h"

#if (PLATFORM_ID == PLATFORM_ANDROID)

#include <jni.h>
#include <errno.h>
#include <stdio.h>
#include <android/sensor.h>
#include <android/asset_manager.h>
#include <android/asset_manager_jni.h>

// include openGL headers
#ifdef SBC_USE_OPENGL
 #include <EGL/egl.h>

 #if (SBC_USE_OPENGL_VERSION == 1)
  #include <GLES/gl.h>
 #elif (SBC_USE_OPENGL_VERSION == 2)
  #include <GLES2/gl2.h>
  #include <GLES2/gl2ext.h>
 #endif
#endif

namespace SBC
{
namespace System
{
typedef struct android_app Application;
} // System
} // SBC

 You can see that we are benefiting from our parameter file params.h where we set OpenGL version 2. Without any further settings it is processed inside system files and the system is parametrized from one place.


Let's try it

 Today there will not be any wow effect when running the engine. But we can at least prove that what we did is working. Go to Main.cpp and add these lines to our native methods:

//------------------------------------------------------------------------
static void engine_start(JNIEnv* aEnv, jobject aObj, jobject aAssetManager)
{
 LOGD("Starting engine ...");
}

//------------------------------------------------------------------------
static void engine_stop(JNIEnv* aEnv, jobject aObj, jboolean aTerminating)
{
 LOGD("Stopping engine ...");
}

 With this you should see log messages in the the LogCat.


Conclusion

 Today we put base for spreading our engine to more platforms in future. Next time we will focus on measuring time.

Download TutGame-03.zip


Friday, August 2, 2013

Building mobile game engine with Android NDK: 2 - calling C++ library from Java


all parts:
1 - installing the tools and running samples
2 - calling C++ library from Java
3 - abstracting types and logging
4 - timing service


 In this part we will start coding of our engine. When building Android NDK engine you can make fully native application or use more or less java. In my engine I am using very thin java layer and I will do the same in this tutorial. So despite the name of this article is promising C/C++ programming we will stick to java most of the time today yet.
 We will create simple java classes for handling application lifecycle and we will initialize OpenGL. 

Project

 Start with New -> Other ... -> Android -> Android Activity. Choose "Android Application Project" and fill the name of the project as well as java package name. Also set min and target SDKs:

 Then click "Next" as long as it is needed. You will end with project created in left panel. I named the project  "TutGame". So, if you want to follow me as closely as possible, name it with the same name.


Game x Engine

 From the beginning we will strictly divide our programming between engine and concrete game. Later you will see that engine is divided to platform specific part and general platform independent part. For now we have in "src" directory just one source file "TutGame.java". Go inside and replace it with this code:

package com.sbcgames.tutgame;

import android.os.Bundle;

import com.sbcgames.sbcengine.SBCEngine;

public class TutGame extends SBCEngine
{
 //------------------------------------------------------------------------
 /** Called when the activity is first created. */
 @Override
 public void onCreate(Bundle savedInstanceState)
 {
  super.onCreate(savedInstanceState);
 }
}

 You will get several (four) errors. It is ok, as referenced classes do not exist yet. This class is now concrete game we want to run in our nonexistent engine. Every new game will have its own name and manifest but will extend common engine class (SBCEngine).

 Next we have to make some changes into AndroidManifest.xml:

<?xml version="1.0" encoding="utf-8"?>
<manifest xmlns:android="http://schemas.android.com/apk/res/android"
    xmlns:myapp="http://schemas.android.com/apk/res/com.sbcgames.tutgame.TutGame"
    package="com.sbcgames.tutgame"
    android:installLocation="preferExternal"
    android:versionCode="1"
    android:versionName="1.0" >

    <!-- to install on SD card  -->
    <uses-permission android:name="android.permission.WRITE_EXTERNAL_STORAGE" />
    
    <uses-sdk
        android:minSdkVersion="9"
        android:targetSdkVersion="18" />

    <!-- Tell the system this app requires OpenGL ES 2.0. -->
    <uses-feature android:glEsVersion="0x00020000" android:required="true" />
    
    <application
        android:allowBackup="true"
        android:icon="@drawable/ic_launcher"
        android:label="@string/app_name"
        android:theme="@android:style/Theme.NoTitleBar.Fullscreen" >
        
        <activity
            android:name="TutGame"
            android:configChanges="orientation|keyboard|keyboardHidden"
            android:label="@string/app_name"
            android:screenOrientation="portrait"
            android:theme="@android:style/Theme.Black.NoTitleBar.Fullscreen" >

            <meta-data
                android:name="android.app.lib_name"
                android:value="sbcengine" />
            
            <intent-filter>
                <action android:name="android.intent.action.MAIN" />
                <category android:name="android.intent.category.LAUNCHER" />
            </intent-filter>
            
        </activity>
        
    </application>

</manifest>

 From the highlighted points we:
  • said that we prefer installation into external storage (and we added required permission few lines later),
  • we say that target device has to have OpenGL 2.0 support,
  • we want full screen for our application,
  • we say that changes in orientation and changes in keyboard configuration will be handled by us, otherwise the activity would restart on this. For example if we changed the orientation of device from portrait to landscape the activity would restart itself without this line,
  • the activity will run in portrait mode,
  • we say the name of our native library with C/C++ code for game and engine
 The manifest is game specific.  While the next step is engine specific.

 Go to "res -> layout" directory and delete "activity_tut_game.xml" file and create new "main.xml" file with the following content:

<?xml version="1.0" encoding="utf-8"?>
<FrameLayout xmlns:android="http://schemas.android.com/apk/res/android"
    xmlns:tools="http://schemas.android.com/tools"
    android:layout_width="match_parent"
    android:layout_height="match_parent" >

    <com.sbcgames.sbcengine.SBCGLView
        android:id="@+id/sbcglview"
        android:layout_width="match_parent"
        android:layout_height="match_parent" />

</FrameLayout>

 Here we just defined our layout that will have SBCGLView as the view class stretched over the whole screen. We will create the class shortly.


C/C++ Engine part

 Now let's jump into C. Create new directory on the same level as "src" and name it "jni". This is where all our C code will reside. Create three empty files in it:
  • Main.cpp
  • Android.mk
  • Application.mk
 Your project now contains cpp file but the project is pure java project. You must go to New -> Other ... -> C/C++ -> Convert to C/C++ Project (Adds C/C++ Nature). You also must set all the paths to headers and set correctly the build command. All these steps were described in first part of the tutorial.

 After this you cen go into Application.mk and put these lines into it:

APP_PLATFORM := android-9
APP_STL      := gnustl_static

# Build for target machines.
#APP_ABI := all
APP_ABI := armeabi
#APP_ABI := x86

 While java apps are running on ARM devices as well as Intel based devices, this is not true for C/C++ apps. You have to build it for every HW platform it will run on. Fortunately you can place libraries for all the platforms into one installation APK and the correct one is loaded at runtime. Here you are selecting for which platforms you want to do the build. When developing you will probably build only for one platform as it takes more time to build for all every time. Default Android emulators eat ARM code. But there is also for example accelerated emulator of Intel based devices so you may build primary for it (x86).

 Now go into Android.mk and put these lines into it:

LOCAL_PATH:= $(call my-dir)

include $(CLEAR_VARS)

# final library name = libengine.so
LOCAL_MODULE    := sbcengine

# turn warning into errors
LOCAL_CFLAGS    := -Werror
LOCAL_CFLAGS    := -Wno-psabi

# build all include paths
# add 4 levels of nesting
# seems to be better way than include all the files one by one
FILE_LIST := $(wildcard $(LOCAL_PATH)/*.cpp)
FILE_LIST += $(wildcard $(LOCAL_PATH)/**/*.cpp)
FILE_LIST += $(wildcard $(LOCAL_PATH)/**/**/*.cpp)
FILE_LIST += $(wildcard $(LOCAL_PATH)/**/**/**/*.cpp)

LOCAL_SRC_FILES := $(FILE_LIST:$(LOCAL_PATH)/%=%)

# include android libraries
# for logging
LOCAL_LDLIBS    += -llog
# for EGL
LOCAL_LDLIBS    += -lEGL
#for openGL (1 or 2)
#LOCAL_LDLIBS    += -lGLESv1_CM
LOCAL_LDLIBS    += -lGLESv2
# for native app
LOCAL_LDLIBS    += -landroid
#openSL
LOCAL_LDLIBS    += -lOpenSLES
#Zlib
LOCAL_LDLIBS    += -lz

include $(BUILD_SHARED_LIBRARY)

 What we do here is that we defined name of our native library (sbcengine) and then we say we want to include all source files (with 4 levels of nesting) into build. In the end we link needed libraries. We are now linking far more than is used in this part of tutorial (like zlib packing library and so on). But in later parts we will need it and we have it linked now.

 It is time to open Main.cpp and put all this into it:

#include <jni.h>
#include <errno.h>
#include <stdio.h>
#include <android/sensor.h>
#include <android/asset_manager.h>
#include <android/asset_manager_jni.h>

#include <GLES2/gl2.h>
#include <GLES2/gl2ext.h>


//forward declarations
static void engine_tick(JNIEnv* aEnv, jobject aObj);
static void engine_resume(JNIEnv* aEnv, jobject aObj);
static void engine_pause(JNIEnv* aEnv, jobject aObj);
static void engine_start(JNIEnv* aEnv, jobject aObj, jobject aAssetManager);
static void engine_stop(JNIEnv* aEnv, jobject aObj, jboolean aTerminating);
static void engine_run(JNIEnv* aEnv, jobject aObj);
static void engine_set_screen_size(JNIEnv* aEnv, jobject aObj, jint aWidth, jint aHeight);

//------------------------------------------------------------------------
static void engine_resume(JNIEnv* aEnv, jobject aObj)
{

}

//------------------------------------------------------------------------
static void engine_pause(JNIEnv* aEnv, jobject aObj)
{

}

//------------------------------------------------------------------------
static void engine_start(JNIEnv* aEnv, jobject aObj, jobject aAssetManager)
{
 AAssetManager* assetManager = AAssetManager_fromJava(aEnv, aAssetManager);
}

//------------------------------------------------------------------------
static void engine_stop(JNIEnv* aEnv, jobject aObj, jboolean aTerminating)
{

}

//------------------------------------------------------------------------
static void engine_tick(JNIEnv* aEnv, jobject aObj)
{
 // Just fill the screen with a color.
 glClearColor(0.5f, 1.0f, 0.5f, 1.0f);
 glClear(GL_COLOR_BUFFER_BIT);
}

//------------------------------------------------------------------------
static void engine_run(JNIEnv* aEnv, jobject aObj)
{

}

//------------------------------------------------------------------------
static void engine_set_screen_size(JNIEnv* aEnv, jobject aObj, jint aWidth, jint aHeight)
{

}

//------------------------------------------------------------------------
extern "C"
{
JavaVM* gJavaVM = NULL;
jobject gJavaActivityClass;
const char* kJavActivityClassPath = "com/sbcgames/sbcengine/SBCEngine";

static JNINativeMethod methodTable[] = {
  {"engine_tick", "()V", (void *) engine_tick},
  {"engine_start", "(Landroid/content/res/AssetManager;)V", (void *) engine_start},
  {"engine_stop", "(Z)V", (void *) engine_stop},
  {"engine_pause", "()V", (void *) engine_pause},
  {"engine_resume", "()V", (void *) engine_resume},
  {"engine_run", "()V", (void *) engine_run},
  {"engine_set_screen_size", "(II)V", (void *) engine_set_screen_size},
};

//------------------------------------------------------------------------
jint JNI_OnLoad(JavaVM* aVm, void* aReserved)
{
 // cache java VM
 gJavaVM = aVm;

 JNIEnv* env;
 if (aVm->GetEnv(reinterpret_cast<void**>(&env), JNI_VERSION_1_6) != JNI_OK)
 {
  //LOGE("Failed to get the environment");
  return -1;
 }

 // Get SBCEngine activity class
 jclass activityClass = env->FindClass(kJavActivityClassPath);
 if (!activityClass)
 {
  //LOGE("failed to get %s class reference", kJavActivityClassPath);
  return -1;
 }

 // Register methods with env->RegisterNatives.
 env->RegisterNatives(activityClass, methodTable, sizeof(methodTable) / sizeof(methodTable[0]));
 gJavaActivityClass = env->NewGlobalRef(activityClass);

 return JNI_VERSION_1_6;
}

} // extern "C"

 In the top there is declaration of our main methods. Most of them is empty now except for engine_tick, where we are setting the color of background to have some reply after we run the app:

//------------------------------------------------------------------------
static void engine_tick(JNIEnv* aEnv, jobject aObj)
{
 // Just fill the screen with a color.
 glClearColor(0.5f, 1.0f, 0.5f, 1.0f);
 glClear(GL_COLOR_BUFFER_BIT);
}

 With line "extern "C"" starts part that that binds these methods for java to recognize them. I wrote separate detailed article which explains what is going on in JNI_OnLoad here. Just to say: JNI_OnLoad is called when the native library is loaded and you can do some setup here to make your life easier. We say here what our methods that will be called from java are and which parameters it takes.


Back to java

 We still have to do some work before we can run our first app. Go into "src" directory and create new package there. The package will name "com.sbcgames.sbcengine" and will have three files in it:
  • SBCEngine.java
  • SBCGLView.java
  • SBCRenderer.java
 First open SBCEngine.java and put this code into it:

package com.sbcgames.sbcengine;

import com.sbcgames.tutgame.R;

import android.app.Activity;
import android.content.res.AssetManager;
import android.opengl.GLSurfaceView;
import android.os.Bundle;

public class SBCEngine extends Activity
{
 static
 {
  System.loadLibrary("sbcengine");
 }
 
 public static SBCEngine sbcEngine;
 
 private GLSurfaceView mSBCGLView = null;
 private AssetManager mAssetManager = null;

 native static void engine_tick();
 native static void engine_start(AssetManager aAssetManager);
 native static void engine_stop(boolean aTerminating);
 native static void engine_pause();
 native static void engine_resume();
 native static void engine_run();
 native static void engine_set_screen_size(int aWidth, int aHeight);

 //------------------------------------------------------------------------
 @Override
 protected void onCreate(Bundle savedInstance)
 {
  super.onCreate(savedInstance);

  sbcEngine = this;

  mAssetManager = getResources().getAssets();
  
  setContentView(R.layout.main);
                mSBCGLView = (GLSurfaceView) findViewById(R.id.sbcglview);
 }
 
 // ------------------------------------------------------------------------
 @Override
 protected void onPause()
 {
  super.onPause();
  
  mSBCGLView.onPause();
  
  if (isFinishing())
   engine_stop(true);
 }

 // ------------------------------------------------------------------------
 @Override
 protected void onResume()
 {
  super.onResume();
  
  mSBCGLView.onResume();
 }
 
 // ------------------------------------------------------------------------
 @Override
 public void onDestroy()
 {
  super.onDestroy();
 }
 
 // ------------------------------------------------------------------------
 public void startEngine()
 {
  engine_start(mAssetManager);
 }
 
 //------------------------------------------------------------------------
 static SBCEngine getSBCEngine()
 {
  return sbcEngine;
 }
 
 //-----------------------------------------------------
 public static int finishApp()
 {
  final SBCEngine engine = getSBCEngine();
  
  engine.runOnUiThread(new Runnable()
  {
   @Override
   public void run()
   {
    getSBCEngine().finish();
   }
  });
  
  return -1;
 }
}

 Now you see that this is engine class which will remain unchanged when writing game (unless you are adding new features into engine). This is the reason why for TutGame we created simple class that is extending this one.
 In the very top you can see line: "System.loadLibrary("sbcengine");" This loads our sbcengine library. Remember we defined the name in Android.mk file. When the library is loaded the JNI_OnLoad method is checked for presence. If present (as is in our case) it is called.
 In onCreate we are setting our previously created main.xml layout as the content of this activity.
 The rest are more or less simple methods handling the activity lifecycle or making our life easier later.

 Next open SBCRenderer.java and put this into it:

package com.sbcgames.sbcengine;

import javax.microedition.khronos.egl.EGLConfig;
import javax.microedition.khronos.opengles.GL10;

import android.opengl.GLSurfaceView;
import android.util.Log;

public class SBCRenderer implements GLSurfaceView.Renderer
{
 private boolean mInitialized = false;
 
 //-----------------------------------------------------
 public void onDrawFrame(GL10 aGL)
 {
  SBCEngine.engine_tick();
 }

 //-----------------------------------------------------
 public void onSurfaceChanged(GL10 aGL, int aWidth, int aHeight)
 {
  Log.d("SBCGLRenderer", "Changed");

  SBCEngine.engine_set_screen_size(aWidth, aHeight);
 }

 //-----------------------------------------------------
 public void onSurfaceCreated(GL10 aGL, EGLConfig aEglConfig)
 {
  Log.d("SBCGLRenderer", "Created");
  
  if (!mInitialized)
  {
   SBCEngine.getSBCEngine().startEngine();
   SBCEngine.engine_run();
   mInitialized = true;
  }
  SBCEngine.engine_resume();
 }
}

 Renderer is class with call back methods that will get called when OpenGL surface is created or changed and also on every frame - 60 times per second in ideal case. You can see that we are simply forwarding the call into the C/C++ library (SBCEngine.engine_tick();) where we are setting the screen background to visually see that our engine works.

 The final class SBCGLView.java is gluing SBCRenderer and SBCEngine together and it is also the place where OpenGL is initialized. Open the file and put this code into it (the code was done with copypasting from several examples):

package com.sbcgames.sbcengine;

import javax.microedition.khronos.egl.EGL10;
import javax.microedition.khronos.egl.EGLConfig;
import javax.microedition.khronos.egl.EGLContext;
import javax.microedition.khronos.egl.EGLDisplay;
import android.graphics.PixelFormat;

import android.content.Context;
import android.opengl.GLSurfaceView;
import android.util.AttributeSet;
import android.util.Log;

public class SBCGLView extends GLSurfaceView
{
 private static final boolean OPENGL_VERSION_2 = true;
 
 //-----------------------------------------------------
 public SBCGLView(Context context)
 {
  super(context);

  init(false, 0, 0);
 }
 
 //-----------------------------------------------------
 public SBCGLView(Context context, AttributeSet attrs)
 {
  super(context, attrs);

  init(false, 0, 0);
 }
 
 //-----------------------------------------------------
 private void init(boolean aTranslucent, int aDepth, int aStencil)
 {
  if (OPENGL_VERSION_2)
  {
   /*
    * By default, GLSurfaceView() creates a RGB_565 opaque surface. If
    * we want a translucent one, we should change the surface's format
    * here, using PixelFormat.TRANSLUCENT for GL Surfaces is
    * interpreted as any 32-bit surface with alpha by SurfaceFlinger.
    */
   if (aTranslucent)
    this.getHolder().setFormat(PixelFormat.TRANSLUCENT);

   /*
    * Setup the context factory for 2.0 rendering. See ContextFactory
    * class definition below
    */
   setEGLContextFactory(new ContextFactory());

   /*
    * We need to choose an EGLConfig that matches the format of our
    * surface exactly. This is going to be done in our custom config
    * chooser. See ConfigChooser class definition below.
    */
   setEGLConfigChooser(aTranslucent ?
      new ConfigChooser(8, 8, 8, 8, aDepth, aStencil) :
      new ConfigChooser(5, 6, 5, 0, aDepth, aStencil)
   );
  }
  
        setRenderer(new SBCRenderer());
 }
 
 //-----------------------------------------------------
 @Override
 public void onPause()
 {
  super.onPause();
  // native pause
  SBCEngine.engine_pause();
  Log.d("SBCGLView", "View paused");
 }

 //-----------------------------------------------------
 @Override
 public void onResume()
 {
  super.onResume();
  // native resume
  Log.d("SBCGLView", "View resumed");
 }

 // -----------------------------------------------------
 private static void checkEglError(String aPrompt, EGL10 aEgl)
 {
  int error;
  
  while ((error = aEgl.eglGetError()) != EGL10.EGL_SUCCESS)
  {
   Log.e("SBCGLView", String.format("%s: EGL error: 0x%x", aPrompt, error));
  }
 }
 
 //-----------------------------------------------------
 // Context Factory
 //-----------------------------------------------------
 private static class ContextFactory implements GLSurfaceView.EGLContextFactory
 {
  private static int EGL_CONTEXT_CLIENT_VERSION = 0x3098;

  //-----------------------------------------------------
  public EGLContext createContext(EGL10 aEgl, EGLDisplay aDisplay, EGLConfig aEglConfig)
  {
   Log.w("SBCGLView", "creating OpenGL ES 2.0 context");
   
   checkEglError("Before eglCreateContext", aEgl);
   
   int[] attrib_list = {EGL_CONTEXT_CLIENT_VERSION, 2, EGL10.EGL_NONE};
   EGLContext context = aEgl.eglCreateContext(aDisplay, aEglConfig,
     EGL10.EGL_NO_CONTEXT, attrib_list);
   
   checkEglError("After eglCreateContext", aEgl);
   
   return context;
  }

  //-----------------------------------------------------
  public void destroyContext(EGL10 aEgl, EGLDisplay aDisplay, EGLContext aContext)
  {
   aEgl.eglDestroyContext(aDisplay, aContext);
  }
 }

 
 //-----------------------------------------------------
 // Config Chooser
 //-----------------------------------------------------
 private static class ConfigChooser implements GLSurfaceView.EGLConfigChooser
 {
  // Subclasses can adjust these values:
  protected int mRedSize;
  protected int mGreenSize;
  protected int mBlueSize;
  protected int mAlphaSize;
  protected int mDepthSize;
  protected int mStencilSize;
  private int[] mValue = new int[1];
  
  /*
   * This EGL config specification is used to specify 2.0 rendering. We
   * use a minimum size of 4 bits for red/green/blue, but will perform
   * actual matching in chooseConfig() below.
   */
  private static int EGL_OPENGL_ES2_BIT = 4;
  private static int[] s_configAttribs2 = {
   EGL10.EGL_RED_SIZE, 4,
   EGL10.EGL_GREEN_SIZE, 4,
   EGL10.EGL_BLUE_SIZE, 4,
   EGL10.EGL_RENDERABLE_TYPE, EGL_OPENGL_ES2_BIT,
   EGL10.EGL_NONE };
  
  //-----------------------------------------------------
  public ConfigChooser(int aRed, int aGreen, int aBlue, int aAlpha, int aDepth, int aStencil)
  {
   mRedSize = aRed;
   mGreenSize = aGreen;
   mBlueSize = aBlue;
   mAlphaSize = aAlpha;
   mDepthSize = aDepth;
   mStencilSize = aStencil;
  }

  //-----------------------------------------------------
  public EGLConfig chooseConfig(EGL10 egl, EGLDisplay display)
  {
   // Get the number of minimally matching EGL configurations
   int[] num_config = new int[1];
   egl.eglChooseConfig(display, s_configAttribs2, null, 0, num_config);

   int numConfigs = num_config[0];

   if (numConfigs <= 0)
    throw new IllegalArgumentException("No configs match configSpec");

   // Allocate then read the array of minimally matching EGL configs
   EGLConfig[] configs = new EGLConfig[numConfigs];
   egl.eglChooseConfig(display, s_configAttribs2, configs, numConfigs, num_config);

   // return the "best" one
   return chooseConfig(egl, display, configs);
  }

  //-----------------------------------------------------
  public EGLConfig chooseConfig(EGL10 aEgl, EGLDisplay aDisplay, EGLConfig[] aConfigs)
  {
   EGLConfig backupConfig = null;
   
   for (EGLConfig config : aConfigs)
   {
    int d = findConfigAttrib(aEgl, aDisplay, config, EGL10.EGL_DEPTH_SIZE, 0);
    int s = findConfigAttrib(aEgl, aDisplay, config, EGL10.EGL_STENCIL_SIZE, 0);

    // We need at least mDepthSize and mStencilSize bits
    if (d < mDepthSize || s < mStencilSize)
     continue;

    // We want an *exact* match for red/green/blue/alpha
    int r = findConfigAttrib(aEgl, aDisplay, config, EGL10.EGL_RED_SIZE, 0);
    int g = findConfigAttrib(aEgl, aDisplay, config, EGL10.EGL_GREEN_SIZE, 0);
    int b = findConfigAttrib(aEgl, aDisplay, config, EGL10.EGL_BLUE_SIZE, 0);
    int a = findConfigAttrib(aEgl, aDisplay, config, EGL10.EGL_ALPHA_SIZE, 0);

    // backup config that should exist every time
    if (r == 5 && g == 6 && b == 5 && a == 0)
     backupConfig = config;
    
    if (r == mRedSize && g == mGreenSize && b == mBlueSize && a == mAlphaSize)
     return config;
   }
   
   Log.w("SBCGLView", "returning backup config");
   return backupConfig;
  }

  //-----------------------------------------------------
  private int findConfigAttrib(EGL10 aEgl, EGLDisplay aDisplay, EGLConfig aConfig,
    int aAttribute, int aDefaultValue)
  {
   if (aEgl.eglGetConfigAttrib(aDisplay, aConfig, aAttribute, mValue))
    return mValue[0];

   return aDefaultValue;
  }
 }
}

 The code is long but all it does is that it sets EGL context, chooses right configuration and sets renderer. Configuration says how much bits is required for red, green or blue color or for depth.


Running

 This was the last piece we needed. You can now build the example and run it in emulator. If everything went OK you should have screen like this:
  While the screen looks statically, it is updated every frame - but the only thing we do is we clear background with green color.


Conclusion

 Today we set basic framework for our engine. There will also be some updates in java part later but there will be less and less of them. Most of the work will move to C/C++. You can download the whole project here:

Download TutGame-02.zip