Follow @SBC_Games
Previous Phaser tutorials:
Phaser tutorial: manage different screen sizes
Phaser tutorial: How to wrap bitmap text
Organizing sprites into atlases is important as it decreases loading time and increases performance of your game. You can create atlas by hand, but it would need lot of effort and it would be time consuming. Usually, you will use some specialised tool. In these days most used tool is Texture Packer. Unfortunately, this tool is just for creating atlases from individual frames and nothing more. It does not allow you to add additional properties to frames of your atlas.
In this article I will show how to add additional properties to frames in Phaser engine, how to create atlas with these properties using SBC PicOpt tool and finally how to build flexible character with them. This is final result:

Although, quality of the .gif animation image is low, you can see we will build Mr. Apple a let him do several movements: blink with eyes, jump, look suspiciously and shake with head.
Problems
Mr. Apple is single object that hides small scene graph in it. The problem is how to build such a graph and how to do it with less effort. For this we will have to use Phaser groups and sprite and we will have to organize them in tree-like hierarchy. If you look at official Phaser examples you can find Group Transform example in which robot is build from parts. In listed code you can read:
    robot.create(90, 175, 'arm-l');
    robot.create(549, 175, 'arm-r');
    robot.create(270, 325, 'leg-l');
    robot.create(410, 325, 'leg-r');
    robot.create(219, 32, 'body');
    robot.create(335, 173,'eye');
This is valid way how to build it, but the ugly part is, that you have to position each part manually in code. If you or your graphic change any part, it is probable, that you will have to rewrite this code to position adjusted part correctly.
Second problem are anchors. For example in Unity each sprite has pivot point as a part of the definition. In Phaser you have to set anchor on sprite instance after it is created. It can turn into another try and miss game until you are happy with your anchor values. Anchors are between 0 and 1 and say how much the sprite image is shifted relative to its position. If your sprite has position 100, 100 and anchor is 0.5, 0.5 then the sprite is centered around position 100, 100.

It is also necessary to say, that Texture Packer saves information on original frame size and anchors are related to it. If you had free space in the frame then this information is still there and anchor 0.5, 0.5 can look like this (that big guy is sprite from famous Golden Axe):

Anchor also can be over 1 or under 0. Then the anchor point is outside of the frame, but it is still valid.
Imagine you have sprites like this and you want to set anchor to points marked with red cross:

It is obvious that for each sprite the anchor values will be different. You can avoid this by making all frames of the same size with lot of free space. But, as soon as you add third sprite which is wider or higher, you will have to adjust all previous frames and also recalculate new anchor values. Just try to guess what is value of this anchor - after several try and miss attempts you find it (of course, you can also calculate it if you measure anchor point distance from top left point and divide it with total frame width for x and height for y):

Third problem is that in Texture Packer you can't add additional markers or extra information on frame and even if you adjusted export by hand or some tool (with for example anchors), then Phaser implementation of atlas loading would ignore it.
So our problems are:
- cumbersome positioning of group parts (sprites or nested groups),
- cumbersome setting of anchors,
- not possible to add additional properties to atlas frames
Mr. Apple
As said earlier, we will build Mr. Apple. It will be build from Phaser groups and sprites. He will have shadow in the bottom, body and head with eyes, eyelids, glasses over it. To animate him later, shadow, body and head will have to be independent parts. If he is jumping, then shadow stays on ground, but rest is in the air. Here is scene graph of Mr. Apple:

Groups are in red and sprites in blue. Top node is Mr. Apple himself so in game you can create several instances and moving it moves all subsequent parts. This is graphical representation of the same scene graph. Groups are that dashed rectangles:

World is Phaser world and it just says that Mr. Apple is placed somewhere... From this analysis we can see, that that it would be fine if we had two additional information on each frame. The red cross is anchor point of sprite and the blue cross is position of next item. It is chained together: red cross position of sprite overlaps blue cross position of previous sprite. The "T" shaped sprite is glasses as we need to draw it over eyes and eyelids. More, eyelids are animated to make blinks.
Sprite atlas with additional properties
Now, we will solve our first two problems. We will create atlas and add information for red and blue crosses. Download SBC PicOpt tool here. It is java application. I wrote it long time ago and the code inside is really very very ugly and bad. If you can imagine any wrong thing in writing code, be sure it is there. Every time I need something I adjust it and it is pure mess now. But, it still works and it is great for me. It can create even very big atlases with hundreds of frames in quite a short time. It can also scale sprites (there is global scale and also individual scales for each sprite) and do lot of other things. One of these thing is, that you can add custom properties to sprites.
If you need short intro into it, read this article. It is for older version, but still valid (new features added since).
Also download this image (right click and save) with Mr. Apple's parts:

If you wonder, what is the magenta grid, it is way how to split frames. The tool will analyze the image and cut sprites from it (it can also load individual images without grid).
In case, you have both the tool and image downloaded and you ran the tool, pres ctrl+N. It is new project. Navigate, where you want to save it and give it name (this time the file is not yet created, only path is remembered ... I warned you, the tool is messy :-)). Now, press ctrl+A or (or go to Bitmap -> Add bitmap and open saved image. Time to save: pres ctrl+S. It creates save file in .xml format. You should see this:
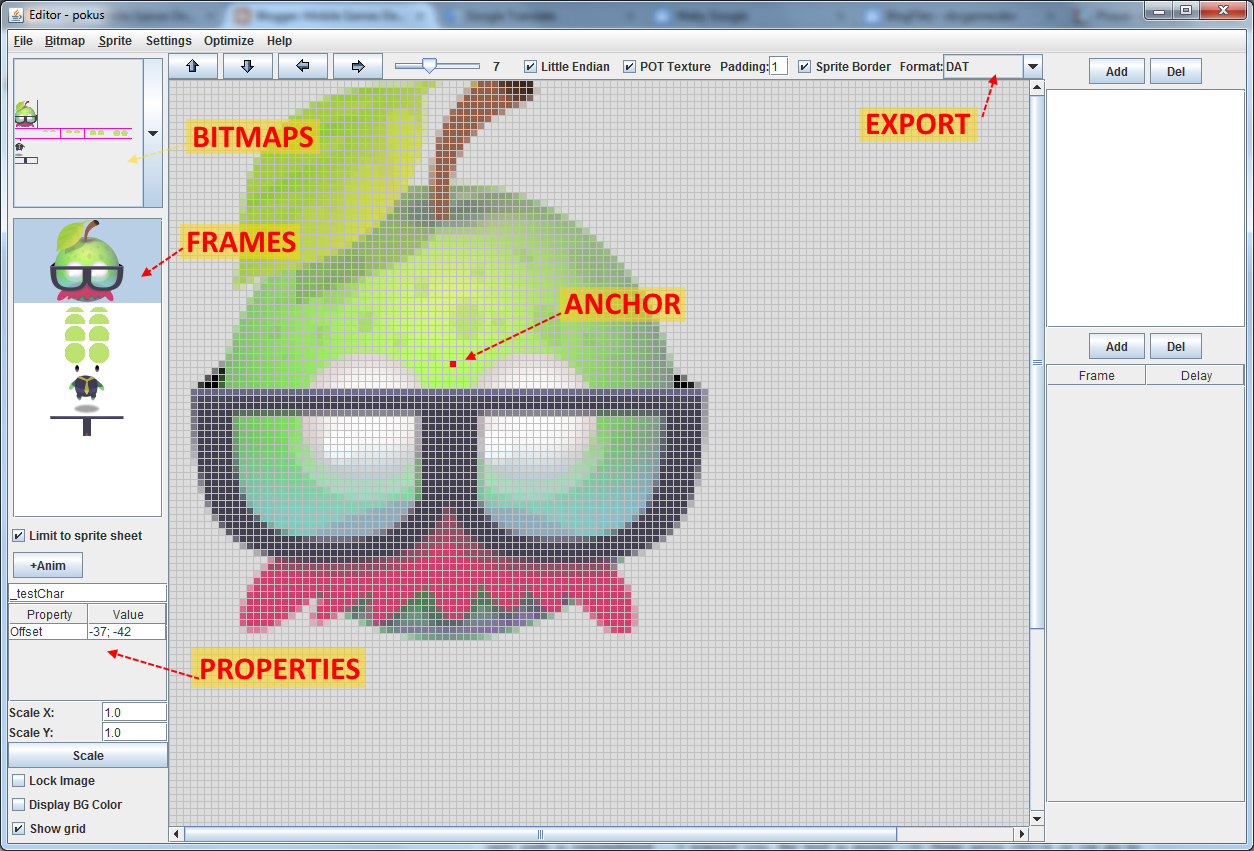
There is red "anchor" point and property "Offset". Offset says how many pixels is top left corner of trimmed sprite from red "anchor" point. This is not exactly what we want, but during export it will be recalculated into anchor information suitable for Phaser. Red point is always fixed - if you want to move it, you have to move sprite itself. In export section there are "JSON - Texture Packer" and "JSON - TP+Properties" items. The first one mimics Texture Packer export and Phaser can load it without problems as JSON Array. The second is the same, but it adds additional properties on each frame - currently the anchor information. This is example export for one frame with "JSON - Texture Packer":
{
 "filename": "head",
 "frame": {"x":1,"y":1,"w":74,"h":82},
 "rotated": false,
 "trimmed": true,
 "spriteSourceSize": {"x":0,"y":1,"w":74,"h":82},
 "sourceSize": {"w":74,"h":86}
}
And this is example for "JSON - TP+Properties":
{
 "filename": "_testChar",
 "frame": {"x":1,"y":1,"w":74,"h":82},
 "rotated": false,
 "trimmed": true,
 "spriteSourceSize": {"x":0,"y":1,"w":74,"h":82},
 "sourceSize": {"w":74,"h":86},
 "anchor": {"w":0.49324,"h":0.50581},
}
Notice the red line with calculated anchor.
Now is time to select export type to "JSON - TP+Properties" and to name each of our frames. Name them in text field above properties on left like this:
- body: "body",
- eyelids: "blick_0", "blick_1", "blick_2", "blick_3", "blick_4",
- eyes: "eyes",
- body: "body",
- shadow: "shadow",
- glasses: "glasses"

This adds new blue point into main area. This additional property point can be dragged with mouse. This is our blue cross. Now, you can place red and blue points like it is on Mr. Apple's scene graph. Or you may load SBC PicOpt project, where sprites are renamed and markers placed here.
Finally, choose Optimize -> Best Place (name of atlas making method). this will create new directory with name "export" and two files in it: .png with atlas and .json with JSON Array. Atlas may look like this, but you can have the sprites on different positions:

{
 "filename": "head",
 "frame": {"x":1,"y":1,"w":74,"h":82},
 "rotated": false,
 "trimmed": true,
 "spriteSourceSize": {"x":0,"y":1,"w":74,"h":82},
 "sourceSize": {"w":74,"h":86},
 "anchor": {"w":0.49324,"h":0.95930},
 "nextitem": {"w":0,"h":-35}
}
Now, we have all assets prepared and we need to persuade Phaser to work with new frame properties.
Code
Code will be written in Typescript and you can get whole final project here (pressing q, w, e, r will force Mr. Apple to do some things).
Phaser can process atlas data in JSON Array, JSON Hash and XML. Each type of data is processed in separate routine in animation/AnimationParser.js source. All these routines do, is that it builds frames (Phaser.Frame) from loaded atlas data. And all we will do, is change this to add our custom callback on every created frame. Here is new class PhaserUtils in module Utils (we will change only JSON Array loading as this is type exported from SBC PicOpt tool):
module Utils {

    export class PhaserUtils {

        // -------------------------------------------------------------------------
        public static ChangeAnimationPhaserJSONData(
            aCallback: (aFrame: Phaser.Frame, aData: any) => void) {

            Phaser.AnimationParser["myCallback"] = aCallback;

            // new implementation of JSON array textureatlas loading routine
            Phaser.AnimationParser.JSONData = function (aGame, aJSON, aCacheKey): Phaser.FrameData {

                //  Malformed?
                if (!aJSON['frames']) {
                    console.warn("Phaser.AnimationParser.JSONData: Invalid Texture Atlas JSON given, missing 'frames' array");
                    console.log(aJSON);
                    return;
                }

                //  Let's create some frames then
                var data = new Phaser.FrameData();

                //  By this stage frames is a fully parsed array
                var frames = aJSON['frames'];
                var newFrame;

                for (var i = 0; i < frames.length; i++) {
                    var uuid = aGame.rnd.uuid();

                    newFrame = data.addFrame(new Phaser.Frame(
                        i,
                        frames[i].frame.x,
                        frames[i].frame.y,
                        frames[i].frame.w,
                        frames[i].frame.h,
                        frames[i].filename,
                        uuid.toString()
                        ));

                    PIXI.TextureCache[uuid] = new PIXI.Texture(PIXI.BaseTextureCache[aCacheKey], <PIXI.Rectangle> {
                        x: frames[i].frame.x,
                        y: frames[i].frame.y,
                        width: frames[i].frame.w,
                        height: frames[i].frame.h
                    });

                    if (frames[i].trimmed) {
                        newFrame.setTrim(
                            frames[i].trimmed,
                            frames[i].sourceSize.w,
                            frames[i].sourceSize.h,
                            frames[i].spriteSourceSize.x,
                            frames[i].spriteSourceSize.y,
                            frames[i].spriteSourceSize.w,
                            frames[i].spriteSourceSize.h
                            );
                    }

                    // HERE is change from default implementation
                    Phaser.AnimationParser["myCallback"](newFrame, frames[i]);
                }

                return data;
            }
        }
    }
}
It is almost pure copy-paste. In top we add myCallback property to original Phaser.AnimatonParser class and we assign parameter passed into method to it. This parameter is function that takes new fresh Phaser.Frame and JSON data and will do some additional processing to default one. Next, we replace implementation of Phaser.AnimationParser.JSONData with copy of original implementation (I had to do small changes to avoid typescript errors - marked in red) and in the bottom we add call to our callback method.
In game class we first call this PhaserUtility method and we pass it "additionalFramProperties". This is the callback method that will get called on every atlas frame created. In it we can finally read our new anchor and nextItem properties. From now on every atlas frame will have it. As we can change this callback, we can have different properties for different atlases!
module CustomFrames {

    export class Game extends Phaser.Game {
        // -------------------------------------------------------------------------
        constructor() {
            // change default loading routine for JSON Array
            var callback = this.additionalFrameProperties;
            Utils.PhaserUtils.ChangeAnimationPhaserJSONData(callback);

            // calculate screen dimensions
            var screenDims = Utils.ScreenUtils.calculateScreenMetrics(800, 500, Utils.Orientation.LANDSCAPE, 800, 500);

            super(screenDims.gameWidth, screenDims.gameHeight, Phaser.AUTO, "content", null /* , transparent, antialias, physicsConfig */);

            // states
            this.state.add('Boot', Boot);

            // start
            this.state.start('Boot');
        }

        // -------------------------------------------------------------------------
        public additionalFrameProperties(aFrame: Phaser.Frame, aData: any): void {
            // anchor
            if (aData.anchor) {
                aFrame["anchorX"] = aData.anchor.w;
                aFrame["anchorY"] = aData.anchor.h;
            }

            // next tem
            if (aData.nextitem) {
                aFrame["nextItemX"] = aData.nextitem.w;
                aFrame["nextItemY"] = aData.nextitem.h;
            }
        }
    }
}
In class MrApple we build Mr. Apple with all its groups and sprites. The constructor method could be written in more compact way, but I left it like it is for easy reading. You can go step by step and see which part is added, where it is positioned:
module CustomFrames {

    export class MrApple extends Phaser.Group {

        private _game: Phaser.Game;

        private _shadow: Phaser.Sprite;
        private _character: Phaser.Group;
        private _body: Phaser.Sprite
        private _top: Phaser.Group;
        private _head: Phaser.Sprite;
        private _eyes: Phaser.Sprite;
        private _blick: Phaser.Sprite;
        private _glasses: Phaser.Sprite;

        // -------------------------------------------------------------------------
        constructor(aGame: Phaser.Game) {
            super(aGame, null, "MrApple group");

            // to save typing
            this._game = aGame;
            var cache: Phaser.Cache = aGame.cache;
            var add: Phaser.GameObjectFactory = aGame.add;

            // shadow
            this._shadow = add.sprite(0, 0, "MrApple", "shadow", this);
            var shadowFrame: Phaser.Frame = cache.getFrameByName("MrApple", "shadow");
            this._shadow.anchor.setTo(shadowFrame["anchorX"], shadowFrame["anchorY"]);

            // character group
            this._character = add.group(this, "character group");
            this._character.position.setTo(shadowFrame["nextItemX"], shadowFrame["nextItemY"]);

            // sprite body
            this._body = add.sprite(0, 0, "MrApple", "body", this._character);
            var bodyFrame: Phaser.Frame = cache.getFrameByName("MrApple", "body");
            this._body.anchor.setTo(bodyFrame["anchorX"], bodyFrame["anchorY"]);

            // top group
            this._top = add.group(this._character, "top group");
            this._top.position.setTo(bodyFrame["nextItemX"], bodyFrame["nextItemY"]);

            // head
            this._head = add.sprite(0, 0, "MrApple", "head", this._top);
            var headFrame: Phaser.Frame = cache.getFrameByName("MrApple", "head");
            this._head.anchor.setTo(headFrame["anchorX"], headFrame["anchorY"]);

            var nextX: number = headFrame["nextItemX"];
            var nextY: number = headFrame["nextItemY"];

            // eyes
            this._eyes = add.sprite(nextX, nextY, "MrApple", "eyes", this._top);
            var eyesFrame: Phaser.Frame = cache.getFrameByName("MrApple", "eyes");
            this._eyes.anchor.setTo(eyesFrame["anchorX"], eyesFrame["anchorY"]);

            // blick
            this._blick = add.sprite(nextX, nextY, "MrApple", "blick_0", this._top);
            var blickFrame: Phaser.Frame = cache.getFrameByName("MrApple", "blick_0");
            this._blick.anchor.setTo(blickFrame["anchorX"], blickFrame["anchorY"]);

            // glasses
            this._glasses = add.sprite(nextX, nextY, "MrApple", "glasses", this._top);
            var glassesFrame: Phaser.Frame = cache.getFrameByName("MrApple", "glasses");
            this._glasses.anchor.setTo(glassesFrame["anchorX"], glassesFrame["anchorY"]);


            // add animations to blick sprite
            this._blick.animations.add("blick_idle", Phaser.Animation.generateFrameNames("blick_", 0, 0, "", 1), 30, true);
            this._blick.animations.add("blick_blick", Phaser.Animation.generateFrameNames("blick_", 0, 4, "", 1), 30, false);
        }

// ... various tween methods to force Mr.Apple do funny things ...

    }
}
In the listing I omitted various methods that are run when q, w, e, r keys are pressed. These methods are playing with tweens and are not subject of this article. You can examine them in final project source.
Conculsion
Mr. Apple is build. If you need to reposition some parts, you can do it in editor, export assets and your code will still work. With small adjustments you can change MrApple class to more universal FruitCharacter class and add Mrs. Pear and other characters like on this image (image is from game Fruit Dating which is puzzle game currently available for iOS and Android and graphics is by Tomas Kopecky):

Download final project here: CustomFrames.zip
No comments:
Post a Comment